Now it's time to characterize our cell library with Cadence SignalStorm. In order to prepare for this, we need a single netlist that contains the extracted verions of all our cells as subcircuits.
First, create a SignalStorm work subdirectory under your SignalStorm working directory called "ss".
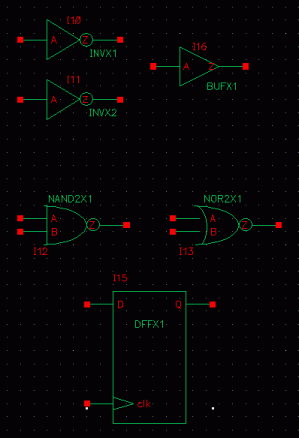
Now, create a new schematic that contains an instance of all our cells.

You might have noticed that I finally cleaned up my inverter symbols. They look much nicer now.
You also might have noticed that I did not include the tristate or fill cells. The tristate cell doesn't contain a pull-up or pull-down network, so SignalStorm wouldn't characterize it even if we put it in. It was designed only to be a component of the DFF. However, if you cell library contains a tristate buffer such as the one shown on page 18 (fig. 1.26) (which has a pull-up/pull-down network), you should include it. The fill cell is only used for fulling in empty space during place-and-route, so there's nothing to characterize there. We'll need this cell later, though.
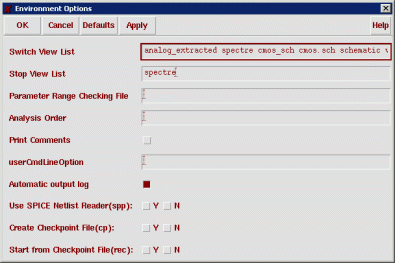
Now start Spectre by selecting Tools | Analog Environment. Set the environment settings such that analog_extracted is the highest priority view. This is extremely important because we want the parasitics included in the cell characterization.

Time time, do not setup the model files.
Generate the netlist using Simulation | Netlist | Create. In the pop-up window, check the netlist and make sure it contains parasitic capacitors. Note the file location in the title bar. Use this to copy this netlist file to your SignalStorm working directory (using a terminal window). Rename the netlist file to "usc_scells.scs".
Also, we need a Spectre-formatted model file for SignalStorm. I have created this file for you by converting the models in /usr/local/3rdparty/cadence/IC5141/tools/dfII/local/models/spectre/nom to a single Spectre model file using the spp command.
In case you're interested, I did this by issuing the following commands:
spp -convert < /usr/local/3rdparty/cadence/IC5141/tools/dfII/local/models/spectre/nom/ami06P.m > ami06.inc
spp -convert < /usr/local/3rdparty/cadence/IC5141/tools/dfII/local/models/spectre/nom/ami06N.m >> ami06.inc
...and then deleting some extraneous text from ami06.inc.
Copy ami06.inc from ~jbakos/cds_work/ss to your SignalStorm working directory.
You will also need a SignalStorm setup file that I have found and modified for you. Copy ~jbakos/cds_work/ss/setup.ss to your SignalStorm working directory.
We need to make a few changes to our netlist file in order for SignalStorm to be able to characterize it. First, we need to add ports to each of our cell subcircuits for vdd and gnd. Normally, the power and ground nets are defined in Spectre netlists as the global signals vdd! and gnd! (which is changed to 0 by the netlister). However, SignalStorm requires that the power and ground connections be explicitly specified for each cell. We can make this change fairly easily.
Open usc_scells.scs in a text editor. First we need to change the global supply signals to local supply signals.
Do a search-and-replace to replace all instances of "vdd!" with "vdd".
Now comes the hard part. We need to replace all instances of net 0 with "gnd". However, 0 shows up in parameters within the netlist, so we need to be careful here. Let's perform three replacements. Replace " 0 " with " gnd ", then "(0 " with "(gnd ", then finally " 0)" with " gnd)". Now you need to append "vdd gnd" to the port lists of each of your subcircuits. You'll have to do this manually.
Now, delete everything above the first subcircuit definition and everything below your last subcircuit definition. If you skip this step, the SignalStorm db_gsim command will fail!
Save your netlist.
SignalStorm characterizes a library by running numerous simulations of your cells using various parameters, then using the results to determine their RC, timing, and power characteristics.
You should run SignalStorm in a directory that exists locally on the machine you're using. Therefore, you
should copy all your SignalStorm work files to (for example) /work/
In the new terminal window, let's startup SignalStorm. Change to your SignalStorm working directory and type "slc".
Type:
set_var SG_SPICE_SIMPLIFY true
This setting will put SignalStorm into "SIMPLE" mode for the purposes of inferring logic in your
transistor structures.
Type:
set_var SG_HALF_WIDTH_HOLD_FLAG true
This setting is required for accurate analysis of your sequential circuits (such as flip-flops).
Type:
set_var SG_SIM_USE_LSF 1
set_var SG_SIM_LSF_CMD ""
set_var SG_SIM_LSF_PARALLEL 10
These settings will setup SignalStorm to run its simulation processes on the local machine using LSF
(Load Sharing Facility) as opposed to using the distibuted server-farm (cluster) approach (if you're
interested in how to do it this way instead, refer to this page).
Type:
set_var SG_SIM_TYPE "spectre"
set_var SC_SIM_NAME "spectre"
These settings will setup spectre as the simulation environment as opposed to HSPICE which is used by
default. If you're wondering why the default simulator in a Cadence produce is HSPICE (a Synopsys product)
rather than Spectre (a Cadence product), then keep in mind that Cadence buys tools from other companies
to form their tool packages. SignalStorm was recently aquired through the acquision of another company.
Due to a bizarre bug in SignalStorm, you also will need to specify your current working directory.
Enter the following two commands:
set_var PWD [your current directory]
set_var CWD [your current directory]
Okay, now we're done setting environment variables. Now down to the good stuff!
Type:
db_open usc_scells
All SignalStorm commands start with "db_". This command opens our working library.
Type:
db_install -model ami06.inc -subckt usc_scells.scs
This command installs our model and subcircuit files into the library.
Type:
db_gsim -force
This is an important command. After you issue this command, SignalStorm analazes your netlist, but ignores
everything except for the transistor interconnections and types of transistors. In other words, it ignores
all parameters and parasitics. The purpose of this analysis is to determine what logical functions
(behaviors) each subcircuit implements, and then to generate test input and output vectors that simulate
their behavior. This is not simply done to test the logic function... it is used to simulate an exhaustive
pattern of valid input combinations to determine the analog characteristics of the cells. You can see now
why SignalStorm is usually run on a cluster computer! This simulation is an NP-complete problem!
This command is really the moment of truth. If you see "no supply0" or "no simulation" anywhere in the
output, then there's a problem.
Unfortunately, even if the command does work, sometimes SignalStorm gets confused as to what function you
re trying to implement with your circuits. In order to verify what it concluded, type the following:
db_gate
This command will output the results of this analysis. Check it over to make sure that SignalStorm made
correct conclusions. If not, there is a way to manually set this information. This output is relatively
easy to interpret.
Type:
db_setup -s setup.ss
This command will read in the SignalStorm simulation setup file. You may need to make changes to this file
based on how you named your cells. I suggest you open this file and see if you can figure out what it means.
If you need help, ask the instructor.
Type:
db_spice -s spectre -keep_log
This command will generate netlists for your cells and launch the simulation processes. After
simulation, it will will generate the results of the simulation and characterization.
I have found that this command often will kernel panic the machine you're using. If this happens,
obviously you'll need to reboot the machine. However, if it continues to happen, you should use
the distibuted approach that is described here.
I have also found that even the parallel approach sometimes crashes the machine. Othertimes,
the simulations will complete but there will failures but without any errors messages anywhere in
the log files. When this happens, re-running the same simulations will produce no errors. I
think all these problems have something to do with the NFS daemon in the way that files are
locked.
Also, whenever you re-run the SignalStorm process, you should first delete the usc_scells
SignalStorm library (type "rm -Rf usc_scells.ipdb/") and the SignalStorm work and log
directories (type "rm -Rf sigstormlc.*").
If you continually get kernel panics with both LSF and parallel mode, I suggest going back
to LSF mode by scaling down the SG_SIM_LSF_PARALLEL value.
The simulations might take awhile. Once the simulations are complete, type:
db_output -r usc_scells.rep -alf usc_scells.alf -p typical
Type:
db_close
exit
Now that're back at our shell window, we need to perform a few additional steps. We need to use the ALF
file that SignalStorm outputs to generate
In order to create the LIB file, we need to create another file in order to specify cell "footprints". These
are used to group cells with identical local functions but different drive strengths so the synthesizer can
easily swap-out weaker cells with stronger cells if the need arises.
Create a new text file called "footprint.def". This file basically defines footprints based on string matches.
An example is shown here:
There's an example footprint.def file in ~jbakos/cds_work/ss. Feel free to use it, but you may need to
add entries for muxes, full-adders, etc.
Once you've created a full footprint file, type:
alf2lib -alf usc_scells.alf -lib usc_scells.lib -def footprint.def
This generates our LIB file. This file contains all the characterization data we need except for one important
attribute that could not be determined from the netlists we brought into SignalStorm. This attribute is cell area.
This is an important attribute because it will allow us to perform synthesis with area constraints. Unfortunately,
the only way to determine this attribute is to manually measure the area for each of our cells.
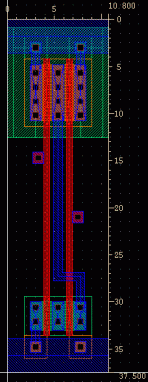
To do this, you'll need to go back into the Cadence tools and measure the width and height of each of your cells,
multiply these numbers, and manually enter this number (expressed in square-microns) into the LIB file. We already
know that all our cells are 40.5 um tall, so you really only need to measure the width. For example, if I take my
NAND2 gate and measure the width and height, I get 40.5 um x 13.5 um = 546.75 um^2.
I got the following measurements for my cells:
For example, here's where I'll plug into the area attribute for the nand2 cell...
Next, type:
alf2veri -alf usc_scells.alf -verilog usc_scells.v
alf2vhdl -alf usc_scells.alf -vhdl usc_scells.vhdl
syn2tlf usc_scells.lib -format 4.3 -ir 50 -if 50 -dr 50 -df 50 -sr 10 -sf 10 -tr 90 -tf 90 -slew_measure_lower_rise 20 -slew_measure_lower_fall 20 -slew_measure_upper_rise 80 -slew_measure_upper_fall 80 -o usc_scells.tlf
You'll get some warnings after you issue this command. That's okay.
alf2html -alf usc_scells.alf -dir html
Finally, we need to use a Synopsys tool called "Library Compiler" to convert the .LIB file into a binary file format
that's read by the Synopsys synthesizer. To do this, type:
lc_shell
Once you're in the command interpreter, type:
read_lib usc_scells.lib
You'll get some warnings. That's okay. Now, type:
write_lib usc_scells
This will write the .DB file for Synopsys. Now type:
exit
You have now completed library characterization!
Conversion of the SignalStorm Output File (ALF)
		cell INV* {
		footprint INV;
		};
		cell NAND2* {
		footprint NAND2;
		};
		cell NOR2* {
		footprint NOR2;
		};
		cell DFF* {
		footprint DFF;
		};
		cell BUF* {
		footprint BUF;
		};

Cell Area DFFX1 4920.75 um^2 BUFX1 1093.5 um^2 INVX1 546.75 um^2 INVX2 546.75 um^2 NAND2X2 546.75 um^2 NOR2X2 546.75 um^2
		/* -------------- *
		 * Design : BUFX1 *
		 * -------------- */
		cell (BUFX1) {
		  cell_footprint : BUF;
		  area : 1093.5;
		  cell_leakage_power : 0.0147813;
		  pin(A)  {
		    direction : input;
		    capacitance : 0.0145936;
		    rise_capacitance : 0.0145739;