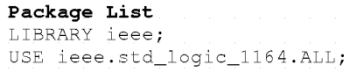
Before we get started with the ResultChecker flowchart, we need to make some modifications to our Package List. First remove "USE ieee.std_logic_arith.ALL;" from the top level, the ALU_tb. It is necessrary to remove "ieee.std_logic_arith.ALL" for it will cause conflicts due to redundant functions available to it and "ieee.numeric_std.ALL". Remember, when we added the random generators, additional libraries were needed for the generators to function correctly. Your ALU_tb Package List should look like this:
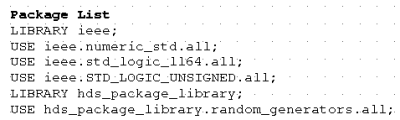
We now need to make a few more modifications to the ALU_tester component's
Package List. We need to once again remove "USE.ieee.std_logic_arith.ALL;"
from the list. We will also add an additional library so that we may
use a function that is not included by default. Please add "USE.STD_LOGIC_UNSIGNED.all;"
the list. This library allows us to use the conv_integer function which
will be demonstrated in a little bit. Your Package List should resemble
the figure below:
The purpose of ResultChecker is test the validity of the results that ALU computed. Based upon the aluop_int value, ResultChecker will verify the results of the operation with the associated generated values of a_int, b_int and shamt_int. We will accomplish this by utilizing a process to sequentially check the expected results.
Begin by Double-Clicking on the ResultChecker
embedded block. Select "Flow Chart" from the window
that opens and click OK.
Just like the Flow Chart that was used in the shifter block,
you will be presented with a blank grid for your process
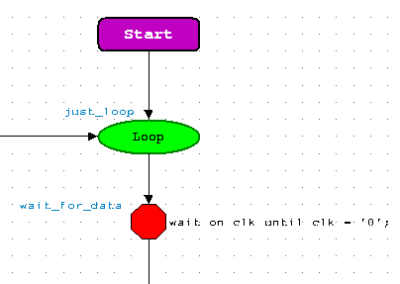
entry. Begin by adding a Start Point to your design.
From the Start Point, we want a "Forever" loop that
will wait until the clock is '0' and will then proceed to check
each "aluop_int" value for a match.
Begin the construction of your ResultChecker by creating
a Forever Loop. The loop will continually check the results as
long as you're simulating. The first action into the loop should be
a wait statement. As our random data is generated on the rising
edge of the clock, we want to wait until the falling edge to assume
it is valid data to be checked. As soon as that condition is met,
our flow will proceed to our first decision box which will check
the ALUOp code. Your flowchart should resemble the figure
below:
Our random generators are creating the sample inputs that will test our ALU. We must now check the outputs to verify that the results meet our expectations. The use of the assertion statement satisfy our needs by checking if the expected conditions are met. The full syntax for the for an assertion statement is as follows:
     ASSERT boolean_expression
     REPORT expression
     SEVERITY expression;
The ASSERT command will evaluate a boolean expression. If the expression returns a TRUE result, our results are as expected. If the expression evaluates as FALSE, we can then generate a REPORT and SEVERITY. The REPORT will print a message in Modelsim with a time when the incident occured. This is helpful when trying to debug what went wrong and when it did. We can also include a value of this type of SEVERITY. This value indicates the degree to which the violation of the assertion affects the operation of our design.
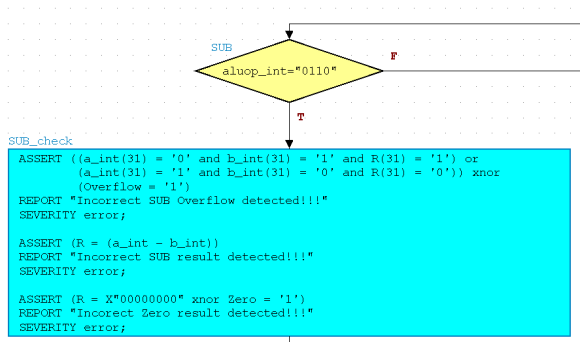
Using the assertion statement, we must evaluate all the generated results of an ALUOp code. For example, the SUB ("0110") which is part of the arithmetic block, generates results for Overflow, Zero and R. We must issue three ASSERT statements and test SUB's functionality. In order to test for Overflow, we would evaluate the sign bits from our generated inputs and computed output. Since there are two combinations of Overflow for SUB, will issue an or statement because our design should Overflow with either cases being true. We then compare the boolean expression of the Overflow check with the Overlow output. Our ASSERT statement should report errors when the two boolean expressions are different. Using an xnor statement, we can accomplish that check. Observe the figure below to construct your ASSERT statements. Remember, if the boolean express is FALSE, a report is generated!
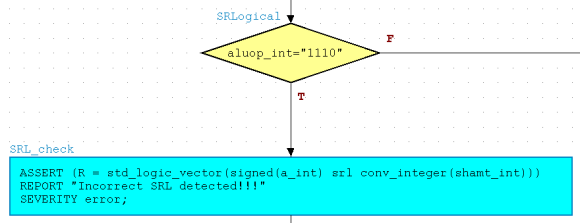
The implementation of the SRL assertion will be simpler than that of SUB. We only have one thing to check, and that is the shifted value. We will be able to easily accomplish this with the use of a function that is defined in the "ieee.numeric_std.all" library that we added earlier. In fact, we will make use of another function from the "ieee.std_logic_unsigned.all" library as well. From the "numeric_std" library, we shall be utilizing the "srl" function:
function "srl" (ARG: SIGNED; COUNT: INTEGER) return SIGNED;
From the function above, we can see that "srl" takes a signed argument and shifts it right with an integer count. Since none of our data conforms to this function's requirements, we will have to convert our data in order for this to work. Our argument a_int will have to be converted to a signed value, and our count shamt_int must be converted to an integer. In order to convert a std_logic_vector into an integer, we must make use of the "conv_integer" from the "std_logic_unsigned" library. After the result has been computed, we will then have to convert it back to a std_logic_vector so that it can be compared to our result R. The function is displayed below:
function CONV_INTEGER(ARG: STD_LOGIC_VECTOR) return INTEGER;
Location of VHDL libraries:
/usr/local/3rdparty/mentor/fpgadv72/Hds/hdl_libs/ieee/hdl/
The figure below is what your Decision Box and Action Box should resemble
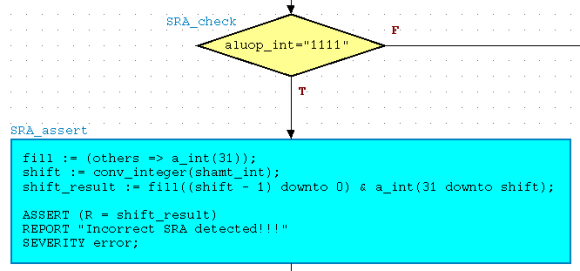
This updated version of the SRA will accomplish the assertion using a method of computation similar to the shifter. We will need three variables to work with. A shift variable that will house the integer value of shamt_int, a fill variable that will house the sign bit of a_int, and a shift_result variable that will contain the computed result. Start off by adding the following Process Declarations to your ALU_tester component.

Input the following code into your Action Box to achieve a SRA assertion.
Notice how the fill variable is used
to append the proper amount of sign bits to a_int just like our
shifter did.
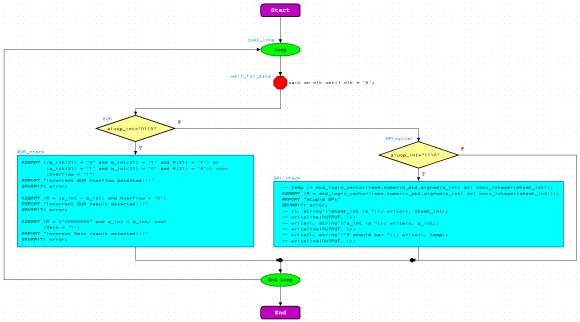
Below is what the ResultChecker should look like with only two ALUOp's being checked. Your finalized version of this will be much bigger.
Note: Before making drastic changes to your design,
make sure that your Test Bench is correctly checking your
results. There's a good possibility that your ALU design
is functioning properly, but not correctly being checked!
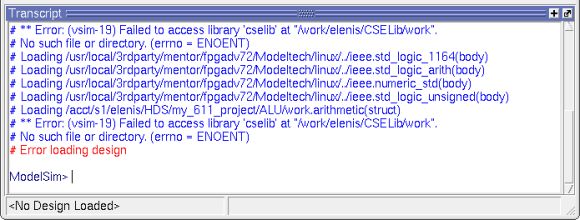
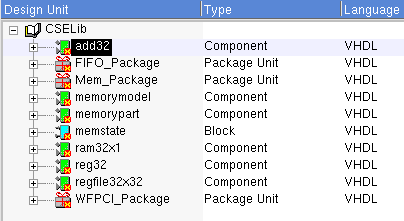
This error is caused by the Arithmetic component which is trying
to use an instance from CSELib. If you check back to your Arithmetc
design, you'll see that it is using add32 from CSELib. Because
add32 has never been run, it has not been compiled for Modelsim. To
fix this, goto CSELib in Design Manager, click it, and then compile
it with Modelsim. Clicking the  while
add32 is highlighted will do the job.
while
add32 is highlighted will do the job.
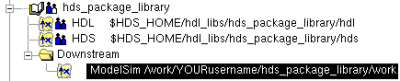
The following error is generated because the moduleware application tries to compile its generated components into a non-writeable directory. We must alter the Downstream directory in order to gain write access.
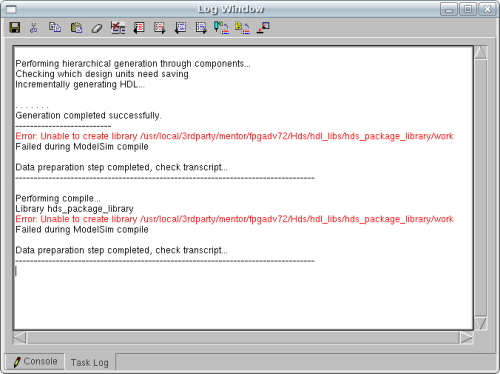
This is what we need to modify:
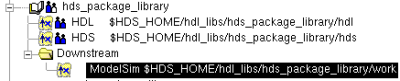
Change the Downstream to your '/work' in which you
should have write access:
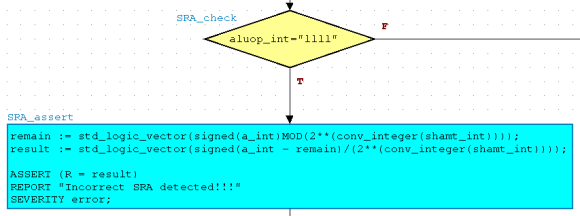
Note: This method fails when ALUOp is "11111" and A is negative. If you think you can solve the problem, please do try.
Unfortunately, Modelsim does not support the "sra" function for an arithmetic
right shift. This must be implemented with a combination of equations.
Normally, the equation "a/2**shamt_int" would be the solution for an
arithmetic right shift since it is essentially a division problem. The problem
lies with how Modelsim handles the operations and rounds the computed results. Due to
rounding problems and type requirements, additional logic had to be incorporated
into the equations. For simplicity purposes, create two variables to store
your computed values.

As you can see, we have a remain variable and a result variable.
The remain will store the remainder value of the division so that we
can remove it from the result equation. By doing so, we remove the
remainder and our value is not incorrectly rounded. The figure below represents
what the SRA should resemble for correct functionality: